Retio & Retio Lite User Manual
This documentation describes the features and use of Retio and Retio Lite speakers.
More products, please visit our Shopify store at www.Retio.co.
Note: For any of ①②③④⑤⑥ mentioned in the article, please refer to the Quick Start Guide image.
Updated: 10/01/2022
Introduction
Retio is a handcrafted retro radio speaker with vintage Nixie tubes, a tribute to the precious moments in the past. It was brought into life with the help of 3,185 Kickstarter backers and their $1,092,597 pledges.
Features
Specifications
Clock
Nixie Tubes
Retio uses four (4) original vintage Nixie tubes manufactured in 1970s to 1990s. They are replaceable on sockets.
Nixie tube type used in Retio (from left to right):
Bluetooth
Retio supports:
Radio
Bands: FM/AM, or FM/DAB+
Audio
Power, Battery and Charging
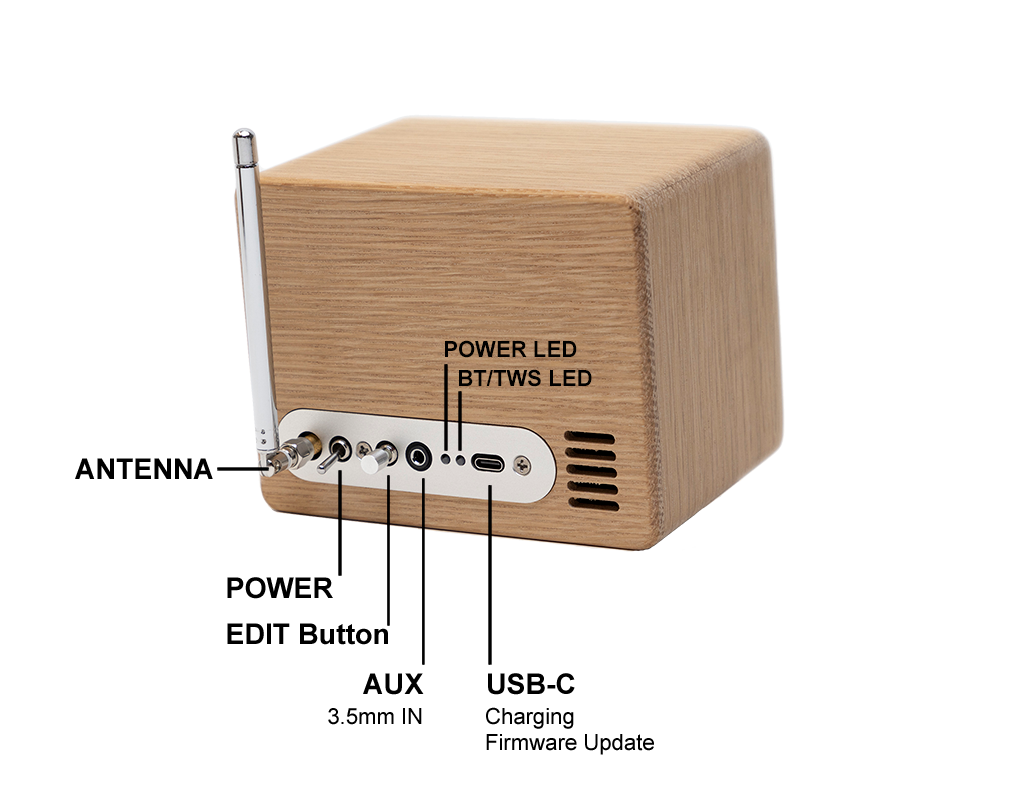
Charging Behavior of Retio & Power LED States
Power LED is the one closer to the AUX port.
Charging Behavior of Retio Lite & Power LED States
Power LED is the one closer to the AUX port.
Models
Currently, Retio has three (3) models with different features.
- Retio FM/AM
- Retio FM/DAB+
- Retio Lite
Wood Case Materials
Retio provides four (4) wood materails for the wood case.
Zebrawood and Wenge are Kickstarter limited editions, and will be discontinued once sold out.
Feet Materials
We also provide two (2) materials for the feet.
Feature Comparisons
| Model | Nixie Tubes | Clock | BT | FM | AM | DAB | AUX | Built-in Battery |
|---|---|---|---|---|---|---|---|---|
| Retio FM/AM | Y | Y | Y | Y | Y | - | Y | 6,700mAh (2x18650) |
| Retio FM/DAB+ | Y | Y | Y | Y | - | Y | Y | 6,700mAh (2x18650) |
| Retio LITE | - | Y | - | - | - | - | 5,200mAh (2x18650) |
Retio Basics
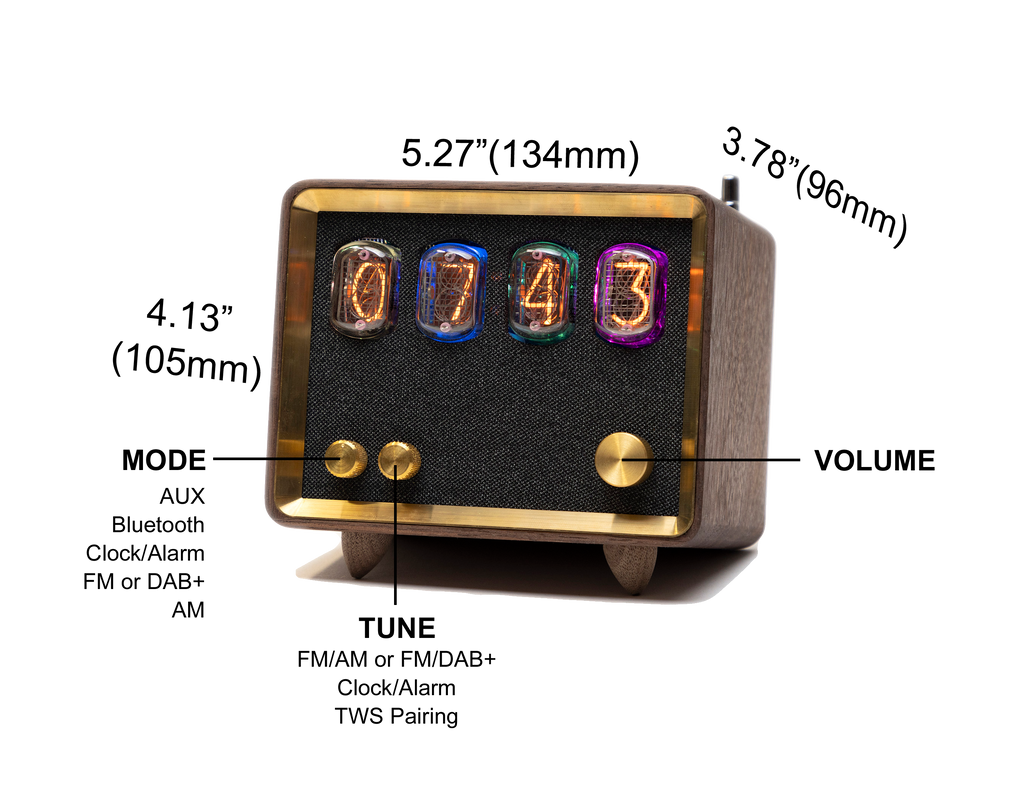
Quick Start Guide

Inputs: Knobs & Buttons
① POWER SWITCH Flip Up/Down② EDIT Click(=Single Press); Long Press(=Press & Hold for 3 sec)③ MODE 5 Stops (Modes)④ TUNE Turn indefinitely; Click(=Single Press); Long Press(=Press & Hold for 3 sec)⑤ VOLUME Turn indefinitely; Click(=Single Press); Long Press(=Press & Hold for 3 sec)⑥ TOUCH PAD TapFeature Matrix
| MODE | AUX | Bluetooth | CLOCK | FM | AM | DAB |
|---|---|---|---|---|---|---|
| Default display | Time | Time | Time | Time after showing FM Frequency for 5 sec | Time after showing AM Frequency for 5 sec | Time after showing DAB Station # for 5 sec |
| Audio Source | AUX | Bluetooth | / | FM Radio | AM Radio | DAB Radio |
| TAP | / | Pause/Resume | Nixie Tubes On/Off (Turn off alarm if it goes off) | Show FM Frequency Momentarily | Show AM Frequency Momentarily | Show DAB Station # Momentarily |
| EDIT Single Press | Change background LED color (RGB looping-Same color looping-Red-Yellow-Green-Purple-Blue-Cyan-White-OFF) |
|||||
| EDIT Long Press | / | Set BT to Discoverable | Set Up Clock/Date | / | / | / |
| TUNE Turning | Change Nixie Brightness | Change Nixie Brightness | Change Nixie Brightness | FM Radio Tuning | AM Radio Tuning | DAB Radio Tuning |
| TUNE Single-Press | / | / | Set Up Alarm | Auto-scan to The Next Station | / | / |
| TUNE Long-Press | / | / | / | / | / | Search Through All Available Stations |
| VOL Turning | Changing Volume | |||||
| VOL Single Press | / | / | / | Turn Off/On Nixie Tube | Turn Off/On Nixie Tube | Turn Off/On Nixie Tube |
| Note | Decimal Point ON indicates Alarm Is Active | How To Change Frequency Ranges & Steps | ||||
During any set up process, when no operation is made for 30 seconds, it will automatically return to its normal status without saving.
5 Modes
Retio has 5 modes, controlled by the MODE knob ③. From counterclockwise (CCW) to clockwise (CW), they are:
AUXBluetoothClockFMAM(for FM/AM model), orDAB+(for FM/DAB+ model)
AUX Mode
Connect your audio source using a 3.5mm audio cable (not included). Plug in one end to the AUX port on the back of Retio.
Retio will always display time in this mode.

Bluetooth Mode
Bluetooth Pairing
RETIO to pair.Bluetooth LED States for Retio
Bluetooth LED is the one closer to the USB-C port.
| LED Color | LED Behavior | Status | Operation |
|---|---|---|---|
| BLUE | Slow Flashing | No Connection | |
| RED | Quick Flashing | TWS Pairing Mode | Long-Press TUNE ④ to Activate |
| RED | Solid On | TWS Pairing Success | |
| BLUE | Quick Flashing | BT Pairing Mode | Long-Press EDIT ② to Activate |
| BLUE | Solid On | BT Pairing Success |
Bluetooth LED States for Retio Lite
Bluetooth LED is the one closer to the USB-C port.
| LED Color | LED Behavior | Status | Operation |
|---|---|---|---|
| BLUE | Slow Flashing | No Connection | |
| RED | Quick Flashing | TWS Pairing Mode | Single-Press EDIT ② to Activate |
| RED | Solid On | TWS Pairing Success | |
| BLUE | Quick Flashing | BT Pairing Mode | Long-Press EDIT ② to Activate |
| BLUE | Solid On | BT Pairing Success |
Clock Mode
To set up time and date:
MODE ③ to CLOCK.EDIT ② to start, the hours display will flash.TUNE ④ to change the hour.EDIT ② to advance to minute. Rotate TUNE ④ to change.EDIT ② to advance to 12-hr or 24-hr mode. Rotate TUNE ④ to toggle.EDIT ② to advance to year. Rotate TUNE ④ to change.EDIT ② to advance to month. Rotate TUNE ④ to change.EDIT ② to advance to date. Rotate TUNE ④ to change.EDIT ② to save and return to normal display.TUNE ④ is NOT rotated at all, Retio's time will stay unchanged.To set up alarm:
MODE ③ to CLOCK.TUNE ④ to view ALARM settings.TUNE ④ to start editing ALARM settings. Hour will flash. Rotate TUNE ④ to change.TUNE ④ to advance to minutes. Rotate TUNE ④ to change.TUNE ④ to confirm. Flashing will stop.TUNE ④ again, it will show the alarm frequency (how many times per week.) 0 means alarm off; 1 means alarm once; 5 means all weekdays; 7 means all days. To edit, long press TUNE ④ until it flashes. Rotate TUNE ④ to change. Single press TUNE ④ to save.TUNE ④ again to choose soundtrack for the alarm. There are 5 soundtracks available. To edit, long press TUNE ④ until it flashes. Rotate TUNE ④ to change. Single press TUNE ④ to save.FM Mode
FM frequency range:
How to use
MODE ③ to FMTUNE ④ to change frequency. Press TUNE ④ to AUTO SCAN. It will stop at the next available station.VOLUME ⑤ to adjust volume.AM Mode
AM frequency range:
How to use
MODE ③ to AMTUNE ④ to change frequency.VOLUME ⑤ to adjust volume.DAB+ Mode
How to use
MODE ③ to DABTUNE ④ to change station.TUNE ④ to re-index all available stations.VOLUME ⑤ to adjust volume.Backlit LEDs
To change the LED color
In any mode, single press the EDIT ② button on the back will change the color of the LEDs behind the nixie tubes in the following order:
Nixie Brightness
To change the brightness of Nixie tubes:
MODE ③ to AUX, BT or CLOCK.TUNE ④ to change brightness.There will be a low humming sound when the nixie tubes are NOT at their full brightness.
To momentarily turn off/on Nixie tubes
* A firmware update is required to use this feature. The firmware version must be v1.0.1 or higher.
Advanced Features
TWS Pairing
Two Retio devices are required to use TWS, no matter they are Retio or Lite. In other words:
(+ means paring via TWS)
How to pair
TUNE ④ to activate TWS Pairing Mode.EDIT ② to activate TWS Pairing Mode.Once Retio/Retio Lite enters TWS Pairing Mode, the BT LED on the back will turn RED and flashes quickly.
Serial Port
When connected to a computer with a USB Type C cable, the serial port of Retio is accessible using the configuration below.
Retio will output operation messages on its serial port, which can be used by advanced users to communicate with external devices.
FM/AM Frequency Range Selection
Retio has four (4) FM frequency ranges.
FM Frequency Range
- 88.1-107.9MHz, step 0.2MHz (mainly for USA)
- 87.5-108MHz, step 0.1MHz (mainly for Europe, Africa, Australia, part of America and Asia)
- 76-95MHz, step 0.1MHz (for Japan)
- 64-108MHz, step 0.1MHz (other)
AM Frequency Range
- 520 kHz - 1710 kHz, 10 kHz spacing: mainly for North American and South America
- 522 kHz - 1611 kHz, 9 kHz spacing
How to Change FM/AM Frequency Range
EDIT ② button and VOLUME ⑤ knob for 2 seconds, Retio will display the current frequency range selection.VOLUME ⑤ knob.TUNE ④ knob.EDIT ② button. Firmware Update
all your settings and saved radio stations.
Go to update.retio.co and follow the instructions on that page.
How To Check the Current Firmware Version of your Retio
MODE ③ to AUXVOLUME ⑤ to see the firmware version on the tube display.Wood Care
FAQ
What if some digits of nixie tubes won't light up
Due to the transportation, the tubes may get loose causing a bad contact on their pins.
This can be solved by:
All digits for ALL nixie tubes were 100% tested twice independently before they are shipped. So most of the time following the above method will solve the issue.
How to improve the FM/AM radio reception
SMA female connector on the back for antenna.SMA connector.How to test the Nixie tube display (TEST MODE)
Power Switch on the back.Clock Mode (the 3rd stop from clockwise).EDIT button on the back, and turn on Retio.EDIT button.TEST Mode. All 4 tubes will display the same digits.VOLUME knob changes the digits from 0 through 9.VOLUME will turn on/off the two colons as well as the decimal at the bottom left corner of the 4th tube (rightmost).What if my Retio is acting/out of order
Under rare circumstances, Reio may not act as expected, such as playing FM radio on BT/AUX mode.
This can be solved by flashing the latest firmware using the link below:
In TWS pairing mode, which Retio speaker plays left/right audio channel?
Can I turn off the LED on the back?
My Retio has a low humming sound. Why?
How to replace nixie tubes without disassembling the whole unit?


Caution:
You need to be very patient to align the tube pins with the pin sockets without seeing them. DO NOT apply force before correct alignment.

